
How to Overclock Mouse Polling Rate & Destroy Input Lag
Imagine losing a $10,000 tournament round because your headshot registered exactly 1 millisecond too late. For competitive gamers playing fast-paced first-person shooters, 1ms is an eternity. It is the literal difference between a registered flick shot and firing blanks into a wall. The pursuit of absolute zero input lag and immediate reaction time has birthed a massive peripheral arms race, pushing hardware data transmission to extreme frequencies.
But true performance isn’t just about plugging in a new device or blindly toggling a drop-down menu inside bloated OEM software. To genuinely optimize your setup and overclock mouse polling rate for the modern competitive arena requires a rigorous understanding of USB microframes, kernel-level interrupt requests, and sensor-level packet saturation.
This definitive guide breaks down exactly what polling rate is, how to bypass factory limits to achieve it, why hyper-polling (4K/8K) is altering the esports landscape, and the harsh truth about why you might actually need to lower your settings to stop system stuttering.
However, before we jump into the complex technical steps of pushing your hardware beyond its limits, we first need to know: what is the mouse polling rate exactly? Let’s break down the core mechanics behind how your hardware communicates.
What is Mouse Polling Rate?
To grasp what is actually happening when peripheral frequencies are modified, one must analyze the physical bridge between human motion and digital rendering. A gaming mouse does not send a continuous, analog stream of data to the host machine. It communicates via discrete, digitized packets governed by the USB Human Interface Device (HID) protocol. The architecture of this protocol is strictly host-driven; the USB controllers must actively interrogate the peripheral plugged into your USB port (or USB slot).
Fundamentally, the USB polling rate (often simply called poll rate) defines the precise frequency at which the host PC “polls” or interrogates the mouse sensor for new positional data ($X/Y$ coordinates) and click states. Think of it as the digital sample rate for your physical mouse surface tracking. Measured in Hertz (Hz), a 125Hz polling rate means the mouse communicates with the computer 125 times per second.
The Physics & Mechanics: What does mouse polling rate do?
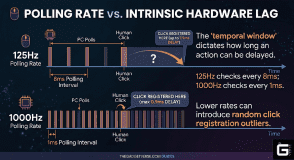
In practical, experiential terms, what does mouse polling rate do? It dictates the size of the temporal window in which a human action can be delayed before the computer even knows it happened.
At a legacy 125Hz polling rate, the host checks for data exactly every 8 milliseconds (ms). If a physical button click occurs precisely 0.1ms after the previous polling cycle concludes, that electrical signal sits idle in the microcontroller unit (MCU) buffer for 7.9ms before the computer retrieves it. This is intrinsic hardware lag.
What does mouse polling rate do beyond theoretical latency reduction? It fundamentally alters the statistical distribution of these input delays.
When analyzing a peripheral’s performance overhead, the entire signal chain must be accounted for. The landmark 2019 CHI Conference study on peripheral latency by Wimmer et al. demonstrated conclusively that average latency metrics are a lie. Because the user’s physical actuation and the computer’s arbitrary USB polling cycle operate entirely asynchronously, latency naturally falls into a multimodal probabilistic distribution. By elevating the polling rate from 125Hz to 1000Hz, the maximum wait time is slashed from 8ms to 1ms. This tightly compresses the variance, effectively eliminating the widest outliers in click registration and spatial tracking.
The Science / Research Insight: The landmark CHI Conference study by Wimmer et al. (2019) developed a probabilistic model proving that end-to-end system latency consists of discrete input, processing, and output phases. Because human activation and USB polling are completely asynchronous, a 125Hz device creates a uniform latency variance up to 8ms. Overclocking to 1000Hz compresses this intrinsic variance to just 1ms, statistically eliminating the widest outliers in click registration.
Reference 1, Reference 2, Reference 3
What Should My Mouse Polling Rate Be?
Enthusiasts constantly ask where the sweet spot lies. The answer depends entirely on your hardware ecosystem and whether you are a casual player or a competitive grinder. The physics of inverse proportionality dictate that every subsequent doubling of the frequency yields exactly half the latency reduction of the previous step.
Here is how the maximum theoretical delays break down:
| Polling Rate | Polling Interval (Maximum Delay) | Latency Reduction from Previous Tier | Est. CPU Load |
| 125Hz | ~8.000 ms | N/A | Negligible |
| 500Hz | ~2.000 ms | 6.000 ms | Ultra-Low |
| 1000Hz | ~1.000 ms | 1.000 ms | Baseline |
| 2000Hz | ~0.500 ms | 0.500 ms | Low |
| 4000Hz | ~0.250 ms | 0.250 ms | Moderate |
| 8000Hz | ~0.125 ms | 0.125 ms | Severe |
The jump from 125Hz to 1000Hz removes a staggering 7ms of potential delay. The jump from 1000Hz to 8000Hz removes a mere 0.875ms. At first glance, this fraction of a millisecond appears irrelevant. It is not.
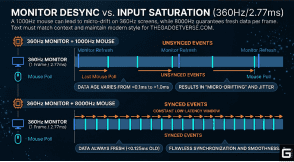
On a 360Hz monitor, a new frame is drawn every 2.77ms. If a standard 1000Hz mouse reports data every 1.0ms, the monitor and the mouse operate on misaligned clocks, resulting in micro-drifting. A 1000Hz polling rate guarantees that the data used for the 2.77ms frame is up to 1ms old. An 8000Hz polling rate guarantees that the data is, at worst, 0.125ms old. This is the essence of input saturation. The monitor never waits for the peripheral; the data is always waiting for the monitor.
- For Casual/Strategy Gamers: A baseline of 500Hz is the perfect balance of smooth cursor tracking, general setup comfort, and low CPU load.
- For Competitive Esports (CS2, Valorant, or a classic game called TF2) and Rhythm Games: 1000Hz remains the undisputed gold standard for standard rigs, providing a near-instant 1ms response time without crippling older systems with high CPU usage.
- The Wireless Mouse Battery Trade-off: Pushing a wireless mouse from 1000Hz to a hyper-polling 8000Hz increases the current draw by roughly 3.4x. An elite sensor might yield ~111 hours of battery life at 1000Hz, but will plummet to a mere ~27 hours at 8000Hz.
How to Change and Overclock Mouse Polling Rate
Before resorting to kernel-level modifications, verify if your hardware supports native adjustments.
1. Standard Methods
- Dedicated Hardware Switches: Many modern esports mice feature physical switches on the bottom plate that cycle through preset rates (e.g., Red for 125Hz, Green for 500Hz, Blue for 1000Hz).
- Official OEM Software: If you use Logitech G HUB (whether for a G Pro X Superlight or even a productivity-focused Logitech Performance Mouse MX), Razer Synapse, or Corsair iCUE, changing the polling rate is as simple as navigating to the “Performance” tab. These settings are often saved directly to the device’s onboard memory. Ensure your high-frequency speed dongle is connected directly to the motherboard.
2. The Advanced Overclocking Guide (hidusbf)
If you have a generic mouse locked at 125Hz or a legendary legacy device like the Microsoft Intellimouse Optical (WMO), you must forcefully rewrite the USB communication rules at the OS level.
During connection, the mouse sends an Endpoint Descriptor containing a hexadecimal field known as bInterval. This instructs the PC how often to poll it. By using a custom kernel module filter driver called hidusbf (which acts as your primary USB Mice Overclocking Software or Overclocking Program), you can intercept this handshake and force a lower bInterval (e.g., dropping a 10ms request to a 1ms request), instantly transforming a 100Hz office mouse into a 1000Hz competitive device.
Step-by-Step Instructions:
- Bypass Memory Integrity: On Windows 11 (and modern builds of Windows 10), the OS uses Hypervisor-Protected Code Integrity (HVCI), which blocks custom drivers unless they pass strict driver signature verification. Open Windows Security > Device Security > Core Isolation, and temporarily toggle “Memory Integrity” to OFF. (Unlike older methods, modern versions featuring the SweetLow certificate or Battle Beaver attestation do not require you to disable Secure Boot or use the command prompt to boot into Test Mode on Windows 11/10). Reboot your PC.
- Run the Setup: Download the EV-signed hidusbf package. Run Setup.exe as an Administrator.
- Apply the Overclock: Select your target mouse. Check the “Filter On Device” box. Change the “Selected Rate” drop-down to 1000Hz, click “Install Service,” and then click “Restart”.
- Validate: Open real-time online tools like a Mouse Poll Rate Test or a Mouse-Sensitivity CPS Test and move your mouse pointer vigorously. If the average stabilizes around 1000Hz, you have successfully bypassed the factory limits.
WARNING: Overclocking forces your motherboard’s USB controller to work harder. Pushing a cheap 125Hz mouse to 1000Hz can occasionally cause system stability issues if the hardware physically cannot handle the interrupt load. (Note: This enthusiast overclocking trend isn’t just for mice; players frequently use similar methods to overclock PlayStation 4 controllers, whereas native Xbox One and Xbox Series X controllers remain notoriously difficult to bypass.
Troubleshooting: Why You Might Need to Lower Your Polling Rate
The pursuit of hyper-polling is not a hardware entitlement. In many scenarios, figuring out how to lower the polling rate is actually the key to fixing your aim and preventing game crashes.
The CPU Stutter Bug & Windows 11 Input Stack
Bombarding a CPU with 8,000 highly prioritized USB interrupts per second can paralyze unoptimized game engines. The engine’s main execution loop is forced to pause rendering to flush the overflowing HID input buffer. Furthermore, if conflicting drivers monopolize Deferred Procedure Calls (DPCs), the CPU physically cannot service the mouse’s demanding 8000Hz queue.
The Fix: If your game tears, frame pacing wildly fluctuates, or you experience violent mouse stutter, drop your polling rate back down to 1000Hz (or 2000Hz) immediately to relieve the CPU choke.
The Nyquist-Shannon Theorem: mouse polling rate making sensitivity too high
A widespread misdiagnosis occurs when players upgrade from legacy hardware to hyper-polling devices and immediately complain about “floaty” aim, extreme jitter, or skipping cursors. They flood support forums asking why their mouse polling rate is making sensitivity too high. The sensitivity has not changed. The operating system’s coordinate mapping has not been altered. The hardware is simply experiencing catastrophic data starvation.
To maintain a stable 8000Hz data stream, the mouse sensor must physically generate enough unique coordinate data points to fill 8,000 distinct packets every single second. If a user stubbornly insists on playing at a legacy 400 Dots Per Inch (DPI) setting—a habit carried over from the Counter-Strike 1.6 era—they must move the mouse at an absurd physical velocity to generate enough data to saturate the bus.
The governing physical relationship is defined by the following formula: Packets per Second = Movement Speed (IPS) × DPI.
At 400 DPI, generating 8,000 packets per second requires physically moving the mouse at 20 Inches Per Second (IPS) constantly. During slow, precise micro-adjustments in tactical shooters, a player’s mouse might only move at 1 or 2 IPS. At 400 DPI, this yields a mere 400 to 800 unique coordinate packets per second. The 8000Hz USB connection, desperate for data to fulfill its 0.125ms microframe quota, is forced to send thousands of “empty” or duplicate packets. The Windows kernel attempts to map these duplicated packets onto a high-refresh-rate display, which the human eye interprets as violent spatial jitter and “floaty” control.
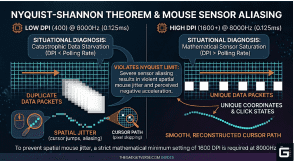
The Science / Research Insight: The Nyquist-Shannon Sampling Theorem states that a continuous signal must be sampled at a rate strictly greater than twice its highest frequency component to reconstruct the signal without introducing aliasing artifacts. Applied to peripheral optics, the sensor resolution (DPI) acts as the spatial sampling rate. It must generate data points significantly faster than the temporal sampling rate (the USB polling interval) requests them. To perfectly reconstruct a physical swipe on a 1440p monitor and completely saturate an 8000Hz connection during slow 5 IPS micro-adjustments, a minimum setting of 1600 DPI is mathematically mandatory. Anything lower violently violates the Nyquist limit, resulting in severe sensor aliasing, which manifests visually as pixel-skipping and micro-stutter.
You can often verify these desync issues using a diagnostic program or browser test. The Blur Busters Mouse Guide highly recommends checking your TestUFO Settings. If you are running with VSYNC ON or VSYNC OFF with your monitor being 144hz (or higher), an improperly scaled polling rate can lead to visible ghost trails and aliasing artifacts.
Hardware Limits: The 4K, 8K, 16K Polling Rate Mouse Era
The Rise of the 4K Polling Rate Mouse
The baseline 1000Hz standard is officially obsolete at the bleeding edge. With a 4K polling rate mouse, latency drops to a blistering 0.25ms. For tracking-heavy titles operating on 360Hz or 540Hz displays, that sub-millisecond reduction is the difference between rendering a frame with fresh coordinate data versus “stale” data from a previous micro-movement.
Flawless Synchronization with an 8K Polling Rate Mouse
Stepping up to an 8K polling rate mouse, the transmission window shrinks to a microscopic 0.125ms. Furthermore, true 8000Hz polling minimizes the deterministic latency penalty introduced by Motion Sync (an algorithm that aligns sensor data with USB packets) down to an invisible ~0.0625ms. This provides flawless synchronization with absolutely zero perceivable lag.
The 16K Polling Rate Mouse Myth
Are we moving toward a true 16K polling rate mouse? Not over standard USB 2.0. The USB 2.0 High Speed specification operates using “microframes” that occur exactly every 125 microseconds (0.125ms). Mathematically, a USB 2.0 controller physically cannot process interrupt polling events faster than 8000Hz (1 / 0.000125 = 8000Hz). Any manufacturer claiming 16,000Hz on a standard single USB 2.0 connection is relying on software interpolation. True 16K hardware requires a leap to asynchronous USB 3.0+ devices.
| Specification Tier | Max Polling Interval | Latency Drop | Motion Sync Penalty | Connection Required |
| 1000Hz (Baseline) | 1.000 ms | Standard | ~0.5000 ms | Standard USB 2.0 |
| 4K Polling Rate | 0.250 ms | Blistering fast | ~0.1250 ms | Standard USB 2.0 |
| 8K Polling Rate | 0.125 ms | Microscopic | ~0.0625 ms | Standard USB 2.0 (Maxed Bus) |
| 16K Polling Rate | 0.0625 ms (Theoretical) | Absolute Zero | Invisible | Asynchronous USB 3.0+ |
Conclusion: Is Overclocking Your Mouse Polling Rate Worth It?
Ultimately, an improperly configured 8K device will actively handicap your competitive gameplay compared to a perfectly optimized 1000Hz setup. True performance optimization ignores marketing hype. It relies instead on a delicate balance: mathematical sensor saturation (using a strict minimum of 1600 DPI), a clean Windows OS environment completely free of DPC latency spikes, and a hardware frequency that precisely matches your high-refresh-rate monitor.
So, is it worth it? Absolutely. Knowing how to overclock mouse polling rate is an incredibly powerful tool for competitive gamers looking to eliminate every last millisecond of intrinsic input lag. Whether you are utilizing kernel-level filter drivers like hidusbf to revive a legacy mouse or fine-tuning a flagship 4K/8K peripheral to stop CPU stuttering, the ultimate goal remains the same: absolute input synchronization.