How Webcam Sensor Technology Affects Your Video Quality
If you’ve ever wondered why two webcams with similar resolution numbers can look completely different in real use, the answer almost never has anything to do with the megapixel count on the box. It comes down to the sensor inside, the lens in front of it, and how well the autofocus hardware handles your specific lighting. This guide breaks down how webcam sensors, lenses, and autofocus motors actually interact to shape the video quality you see on a call with no fluff, just the technical truth.
Quick Answer: Modern webcams have shifted from older CCD sensors to active-pixel CMOS sensors to fit within the low power limits of USB. For the best image quality, prioritize larger physical sensor sizes (like 1/2.8-inch) over high megapixel counts. Look for Back-Side Illumination (BSI) to maximize light capture, and multi-element glass lenses to avoid thermal focus drift. If you need reliable autofocus, look for Voice Coil Motor (VCM) systems tuned with software look-up tables to prevent focus hunting in low light.
CMOS vs. CCD: Why Webcams Moved Away from CCD Sensors
All digital image sensors rely on the same basic principle: light hits silicon and knocks electrons loose, and that buildup of charge becomes your image. Older charge-coupled device (CCD) sensors were known for clean, consistent images, but they needed complex external circuitry to function which made them power-hungry. That is the main reason CCDs have largely disappeared from modern desktop webcams in favor of active-pixel CMOS sensors.
The two architectures handle charge very differently:
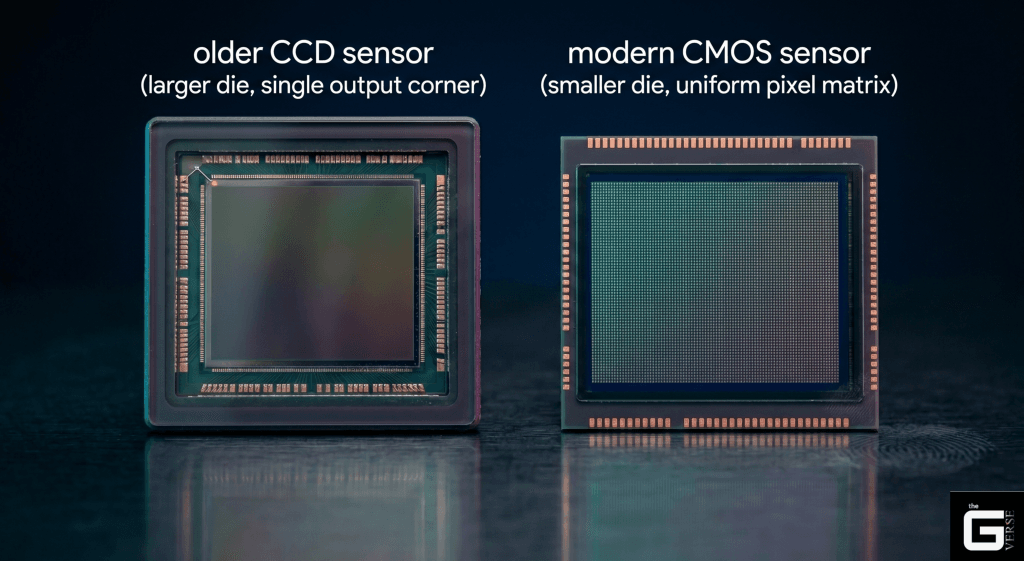
CCD architecture: Charge is shifted row-by-row across the entire chip toward a single output amplifier like a bucket brigade passing data along one at a time.
CMOS architecture: Each pixel converts its own charge to voltage locally, so there is no need to shift anything across the chip at all.
To see the practical difference, it helps to compare a classic CCD sensor against a modern CMOS sensor of similar class.
Noise and amplification: A CCD pushes every pixel’s signal through one shared amplifier, one at a time. That creates a noise bottleneck older CCD sensors in this class typically settled around 11–12 electrons of dark noise. A modern CMOS sensor handles this differently: each column gets its own amplifier and analog-to-digital converter, which pushes that noise floor down to roughly 2 electrons or less.
Dynamic range and shutter type: A typical CCD in this category reaches a linear dynamic range of around 60 dB. Modern CMOS sensors, using more advanced on-chip processing, can reach well over 100 dB. Most consumer CMOS webcams use a rolling shutter, which reads the frame line by line. Specialized industrial CMOS sensors use a global shutter instead, capturing the entire frame at once useful for fast-moving subjects, since it avoids the skewed “jelly” distortion a rolling shutter produces at high speed.
Technical Note: Under imaging standards like EMVA 1288, CCD read noise is fundamentally limited by its single sequential output amplifier, which keeps older CCD designs in the low double-digit electron range for dark noise. Modern CMOS designs sidestep this limit entirely by digitizing the signal at the column level instead of funneling everything through one amplifier which is how they reach sub-2-electron noise floors.
How Charge Actually Moves: Shift Registers vs. Column ADCs
The decline of CCDs in webcams comes down to how each sensor physically moves charge.
In a CCD, the entire sensor array works like an analog shift register — once exposure ends, charge packets have to be physically shifted row by row across the silicon to a single output node. This requires high-voltage clocking pulses, and it is vulnerable to vertical smearing if a bright light leaks into the registers mid-readout.
CMOS sensors avoid this entirely by keeping the charge local to each pixel. Every pixel has its own transistors that convert charge to voltage right where it is collected. To keep that signal clean, CMOS sensors use a technique called correlated double sampling (CDS): the pixel’s reset voltage gets measured first, then the actual signal voltage after exposure, and subtracting the two cancels out most of the thermal noise and small manufacturing inconsistencies between pixels.
Why CMOS Fits USB Power Limits and CCD Doesn’t
Power budget is one of the biggest reasons CMOS won out in webcam design.
A standard USB 2.0 port only supplies up to 5V at 500mA, which caps the entire webcam at 2.5W of power.
CCDs are simply too power-hungry for that. Shifting analog charge across the chip requires external driver circuitry and clocking voltages well above 12V, which blows past what USB can supply and generates excess heat in the process.
CMOS sensors run on much lower voltage rails typically under 3V with the amplifiers, timing circuits, and ADCs all built directly onto the same chip. That keeps total sensor power draw well under 300mW.
This matters beyond just the power budget too: sensor dark noise roughly doubles for every 6–8°C rise in temperature, so a cooler-running sensor also means a cleaner image during extended video calls.
Quantum Efficiency: How Much Light Actually Becomes Signal
Quantum efficiency (QE) is the percentage of incoming photons that actually get converted into usable electrons and it is one of the most important but least-talked-about specs in webcam sensor technology.
For a sensor to register light at all, an incoming photon needs enough energy to knock an electron loose in silicon roughly 1.12 eV. That sets a natural cutoff point in the near-infrared range, beyond which silicon stops responding to light at all.
In the visible spectrum, QE depends heavily on:
- The sensor’s physical structure
- The tiny microlenses sitting on top of each pixel
- Whether the sensor uses FSI or BSI architecture (explained below)
What QE numbers actually mean in practice:
| QE Level | What It Means | Typical Technology |
| Under 40% | Older FSI CMOS sensors | Budget webcams |
| 40–60% | Mid-range CMOS sensors | Most 1080p webcams |
| 60–80% | Modern BSI CMOS sensors | Premium webcams like Logitech Brio 500 |
| 80%+ | Specialized BSI sensors | Sony STARVIS-class sensors |
Instead of splitting incoming light with an expensive prism setup like high-end broadcast cameras use, webcams rely on a single sensor topped with a color filter grid to capture color in a small, low-cost package. This limits peak QE compared to prism-based cameras — but modern BSI sensors compensate by clearing the optical path entirely.
Technical Note: Because silicon needs roughly 1.12 eV of photon energy to generate a usable electron, sensor manufacturers add precision microlens arrays above each pixel to funnel incoming light directly into the active sensing area, rather than letting it scatter off surrounding wiring. Sony’s STARVIS and STARVIS 2 sensor lines achieve high quantum efficiency in both visible and near-infrared ranges which is a key reason they appear in premium low-light webcams.
How a Webcam Sensor Converts Light Into a Digital Image
The full image pipeline inside a modern webcam follows a consistent sequence:
- Optical gathering — Light passes through the lens, an IR-cut filter, and a microlens array before reaching the pixel layer.
- Color filtering — A Bayer filter pattern splits incoming light into red, green, and blue channels across the pixel grid.
- On-chip noise reduction and amplification — Correlated double sampling removes reset noise, then analog gain is applied.
- Digitization — Column-parallel ADCs convert the analog signal into 10-bit or 12-bit raw digital data.
- ISP processing — The onboard Image Signal Processor (ISP) reconstructs full color, sharpens the image, applies noise reduction, and compresses the stream for USB transmission.
Each step introduces trade-offs. More aggressive ISP noise reduction, for example, reduces visible grain but also softens fine detail — which is why cheap webcams often look ‘smooth but smeared’ in dim lighting rather than genuinely sharp. You can explore our complete breakdown of the full end-to-end processing pipeline and UVC handshake to see how Windows renders your feed in real-time, mapping exact computational signals across legacy and modern USB interface configurations.
Microlenses, Color Filters, and Demosaicing
Since silicon itself cannot distinguish color, webcams place a Bayer color filter array directly over the sensor roughly 50% green, 25% red, and 25% blue, matching how sensitive human eyes are to each color.
Because each pixel only captures one color, the ISP has to reconstruct the missing two colors at every pixel through a process called demosaicing.
Bilinear interpolation is the simplest method it averages nearby pixels of the same color. It is fast, but it tends to blur fine detail and can cause color fringing along sharp edges.
Edge-directed interpolation is the more advanced approach. The ISP checks for local contrast gradients first, figures out whether an edge is horizontal or vertical, and interpolates along that edge rather than across it. This keeps boundaries sharp and avoids false colors near high-contrast lines for example, the edge of a whiteboard behind you on a video call.
The quality of the demosaicing algorithm is a major reason why two webcams with identical sensor hardware can produce noticeably different images: the ISP firmware makes the difference.
Front-Side vs. Back-Side Illumination (FSI vs. BSI)
This is one of the most impactful and most misunderstood differences in webcam sensor design.
In older Front-Side Illuminated (FSI) sensors, the metal wiring sits directly above the photodiode layer. That wiring physically blocks a meaningful portion of incoming light before it ever reaches the sensor, hurting overall light sensitivity and capping quantum efficiency.
Modern webcams use Back-Side Illuminated (BSI) sensors instead. During manufacturing, the silicon wafer gets flipped and thinned down to just a few micrometers, moving the wiring layer behind the photodiodes instead of in front of them. That clears an unobstructed path for incoming light, pushing peak quantum efficiency well past 80% and noticeably improving performance in dim rooms.
FSI vs. BSI at a glance:
| Feature | FSI Sensor | BSI Sensor |
| Wiring position | In front of photodiodes | Behind photodiodes |
| Peak QE | ~40–55% | ~70–85% |
| Low-light performance | Moderate | Significantly better |
| Manufacturing cost | Lower | Slightly higher |
| Common in | Budget webcams | Mid-range to premium webcams |
Real-world examples:
- Logitech C920 — FSI CMOS sensor; acceptable in bright light, struggles below 50 lux
- Logitech Brio 500 / Razer Kiyo Pro — BSI CMOS sensor; noticeably cleaner at 10–20 lux
Technical Note: Thinning the silicon substrate in BSI sensor designs lets light strike the active sensing region directly rather than passing through a layer of wiring first. This pushes fill factor close to 100% and gives BSI sensors a real, measurable edge in low light over equivalent FSI designs, where a significant portion of incoming light gets scattered or absorbed by routing lines before it is ever recorded.
Sensor Size vs. Megapixels: The Resolution Marketing Trap
A common assumption is that higher resolution (like a 4K sensor) automatically means a sharper image. In reality, cramming more megapixels onto the same physical sensor size forces each individual pixel to shrink — and smaller pixels are worse in nearly every measurable way.
The diffraction problem:
Light passing through any lens aperture spreads slightly into a small blur circle called an Airy disk, rather than landing as a perfect point. At f/2.0, that blur circle measures roughly 2.7 micrometers across. Once your pixel pitch shrinks smaller than that blur circle, fine detail gets physically smeared across multiple pixels meaning the extra resolution is not actually capturing more real detail.
The full-well capacity problem:
Smaller pixels simply hold fewer electrons before they saturate. This lowers dynamic range and increases visible noise, especially in anything other than bright, even lighting.
| Sensor Format | Active Area | Typical Resolution | Pixel Pitch | Airy Disk (f/2.0) | Optical Impact |
| 1-inch (Premium 4K) | ~116 mm² | 8.3 MP (4K) | 3.1 µm | ~2.7 µm | Fully resolves detail — pixel size exceeds diffraction limit |
| 1/2.8-inch (1080p-class) | ~21.7 mm² | 2.07 MP (1080p) | 2.9 µm | ~2.7 µm | Well matched — pixel size closely tracks the lens diffraction limit |
| 1/2.8-inch (QHD-class) | ~21.7 mm² | 5.0 MP (QHD) | 2.0 µm | ~2.7 µm | Minor diffraction softening, partly offset by ISP sharpening |
| 1/4-inch (Budget 4K) | ~7.7 mm² | 8.3 MP (4K) | 1.1 µm | ~2.7 µm | Heavy diffraction blur — fine detail smeared across multiple pixels |
What this means when buying:
A 1080p webcam with a 1/2.8-inch BSI sensor will typically produce a sharper, cleaner image in real-world lighting than a budget 4K webcam with a 1/4-inch FSI sensor despite having one-quarter the advertised megapixel count.
Technical Note: Dynamic range is fundamentally bound by a pixel’s full-well capacity and its dark noise floor. A roughly 3.0 µm pixel with a healthy electron capacity can reach around 80 dB of dynamic range, while a tiny 1.1 µm pixel is physically capped much lower typically around 60 dB regardless of how good the ISP processing is.
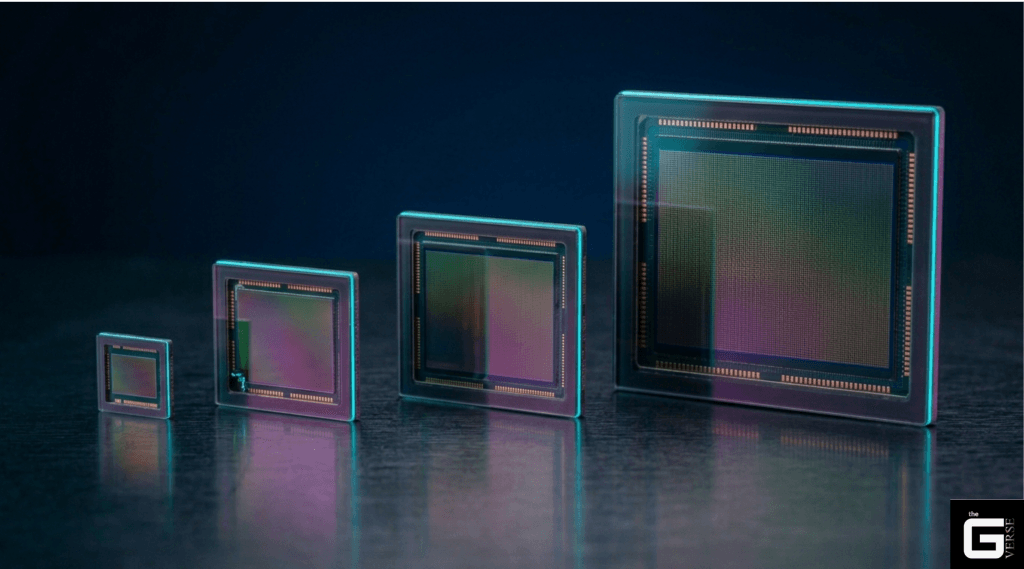
Low-Light Performance: Why Sensor Size Matters More Than You Think
Sensor size has an outsized effect on how a webcam performs under typical home or office lighting think dim rooms around 10 lux or less, which is common in home offices without dedicated ring lights.
How sensor size affects light gathering:
Every square millimeter of sensor area collects a fixed number of photons for a given lighting condition. A larger sensor simply collects more total light which means the ISP can produce a clean image without having to apply heavy digital noise reduction to compensate.
1/4-inch sensors have a small active area of around 7.7 mm². Because they collect relatively few photons, low light pushes them to lean heavily on digital noise reduction which typically results in a soft, muddy, low-contrast image where fine detail gets smeared away.
1/2.7-inch sensors offer roughly three times the active area of a 1/4-inch sensor. That extra surface area gathers meaningfully more light, which means a clean Full HD image without needing aggressive noise filtering.
1/1.3-inch sensors (found in some premium streaming-focused webcams) push this further — capturing significantly more light than a standard 1/2.8-inch sensor and enabling genuinely usable video at 5 lux or below.
Approximate low-light performance by sensor size:
| Sensor Size | Active Area | Usable Down To | Typical Result at 10 Lux |
| 1/4-inch | ~7.7 mm² | ~50–80 lux | Heavy grain, washed-out color |
| 1/2.7-inch | ~22 mm² | ~15–25 lux | Acceptable noise, reasonable detail |
| 1/2.8-inch BSI | ~21.7 mm² | ~10–15 lux | Clean image, good color |
| 1/1.3-inch BSI | ~57 mm² | ~3–5 lux | Excellent detail, minimal noise |
Software compensation has hard limits:
Some webcams advertise AI-based low-light enhancement or HDR mode. These features help but cannot overcome fundamental physics they are working around the sensor’s limitations, not eliminating them. A small sensor with software enhancement will still fall short of a large sensor in dim conditions.
Glass vs. Plastic Lenses: Why It Actually Matters
Even a great sensor can be held back by a mediocre lens. Premium webcams use optical glass elements; budget webcams almost universally use injection-molded plastic.
The optical difference:
Glass lenses such as those made from optical crown glass (refractive index around 1.52, Abbe number near 64) separate colors cleanly and stay dimensionally stable across a wide temperature range.
Polycarbonate plastic lenses have a higher refractive index (around 1.59) but a much lower Abbe number (around 34). A lower Abbe number means more chromatic dispersion — more noticeable color fringing along high-contrast edges, which shows up as faint colored halos around bright objects in webcam footage.
The thermal drift problem:
Plastic lenses also suffer from thermal focus drift. As a webcam runs for an extended period, internal temperatures can climb toward 60°C. Glass holds its shape and refractive properties through that range. Common optical plastics like PMMA do not — their refractive index shifts measurably as they heat up, which physically moves the focal point and causes video to drift slightly out of focus during a long call.
Glass vs. plastic lens comparison:
| Property | Glass Lens | Plastic (Polycarbonate/PMMA) Lens |
| Abbe number | ~64 (crown glass) | ~34 (polycarbonate) |
| Chromatic aberration | Low | Noticeably higher |
| Thermal stability | Excellent | Poor — index shifts at ~60°C |
| Scratch resistance | High (with coating) | Low — micro-scratches easily |
| Manufacturing cost | High | Very low |
| Typical use | Premium webcams | Budget webcams |
Why cheap webcams use plastic:
This comes down entirely to manufacturing cost. Glass lenses require precise grinding and polishing, and curved (aspherical) shapes need specialized high-temperature molding all of which makes multi-element glass lens assemblies expensive at scale.
Plastic lenses skip nearly all of that. Optical-grade polymer gets melted and injection-molded into a finished aspherical shape in under 30 seconds per unit which is a major reason nearly every budget webcam under $50 uses plastic. The trade-off: uncoated plastic lenses are noticeably softer and easier to scratch. Wiping a dusty plastic lens with a dry cloth can leave micro-scratches that scatter light and gradually reduce image contrast over time.
Technical Note: Crown glass maintains stable focus across normal operating temperature swings, while uncoated optical plastics like PMMA experience a real shift in refractive index as they warm up. This is the underlying cause of the slow focus drift some budget webcams show during extended video calls — the lens itself is physically changing shape under heat.
How Autofocus Works: Voice Coil Motors Explained
To shift from a fixed focus point to active autofocus, webcams need a small motor capable of physically moving the lens along its optical axis. The standard hardware for this job is the Voice Coil Motor (VCM) the same basic technology used in smartphone camera autofocus.
A VCM is a spring-loaded actuator: when current passes through a small coil, it interacts with a surrounding permanent magnet’s field, generating a force that pushes the lens carrier forward against suspension springs. This allows very fine, sub-micron position adjustments without any gears or complex mechanics.
Why VCM dominates the market:
- No gears = silent operation (important for video call microphones)
- Sub-micron precision via simple current control
- Extremely compact form factor fits within thin webcam housings
- Mature, high-volume supply chain keeps costs low
Fixed Focus vs. Active Autofocus
Fixed-focus lenses have no moving parts at all. The lens is permanently set during assembly to stay sharp across a wide range of distances — its hyperfocal distance — giving a wide depth of field from roughly half that distance out to infinity. It is mechanically simple and cheap, but it struggles with anything held very close to the camera, typically anything closer than about 40cm.
When fixed focus is fine:
- Standard desk video calls at normal distance (50cm–2m)
- Budget or travel webcams where simplicity matters
- Conference room cameras with fixed seating arrangements
Active autofocus systems constantly adjust lens position to find maximum sharpness. This makes them better suited to:
- Presenting physical documents or objects close to the camera
- Users who move frequently during calls
- Content creators who vary distance from the camera
Active autofocus trade-offs:
Active autofocus adds cost, power draw, and the risk of focus hunting in low light (covered in the next section). For a standard desk setup with a fixed distance from camera to face, a quality fixed-focus lens with a wide hyperfocal range will often produce more consistent results than a cheap autofocus implementation.
Field of View: How Focal Length Changes What You See
A webcam’s field of view comes down to two things: focal length and the physical size of its sensor. These two factors together determine how much of the scene appears in frame.
Shorter focal lengths (around 2.8mm) produce a wider field of view — useful for group settings or huddle rooms where multiple people need to fit in frame. They also introduce more perspective distortion, which can make faces look slightly elongated at close range.
Longer focal lengths (4mm and above) narrow the field of view, framing a single presenter more tightly and with less perspective distortion — generally more flattering for solo video calls.
Common webcam FoV options:
| Field of View | Focal Length (approx.) | Best Use Case |
| 90° diagonal | ~2.8mm | Group calls, huddle rooms, multiple people |
| 78° diagonal | ~3.5mm | Standard desk setup, solo calls |
| 65° diagonal | ~4.5mm | Tight framing, solo presenter |
Some premium webcams (like the Logitech Brio 4K) offer adjustable field of view via software, letting you switch between wide, standard, and narrow framing without physically moving the camera.
🔬 Technical Note: High-grade neodymium magnets are used in VCM autofocus assemblies specifically because they hold their magnetic strength well even as internal temperatures climb inside a compact USB housing — keeping focus response consistent rather than degrading as the device warms up during use.
Why Webcams Hunt for Focus in Low Light
Most autofocus webcams use contrast-detection autofocus (CDAF): the ISP looks at contrast between adjacent pixels and moves the lens step by step until it finds the sharpest edges. In low light, sensor noise makes that contrast harder to read clearly, which can cause the camera to repeatedly rack back and forth without settling commonly called focus hunting.
Why this happens technically:
In bright light, the signal-to-noise ratio is high enough that the ISP can easily identify the contrast peak. In dim light, noise effectively “blurs” the contrast signal — the ISP cannot reliably tell whether it has found the sharpest point or just a noise spike, so it keeps searching.
How quality implementations prevent focus hunting:
To prevent this, manufacturers use a two-step scanning approach paired with a calibrated lookup table (LUT) for lens movement:
- Coarse scan — A fast pass using larger movement steps to roughly locate the focus peak
- Fine scan — Once the peak area is identified, a slower, smaller-step scan locks onto the precise sharpest point
The lookup table maps specific lens positions to known depth values, reducing the range the motor needs to search in the first place. Webcams without this calibration tend to hunt across the full focus range every time lighting conditions change — which is the flickering, searching behavior you often see in budget autofocus webcams in dim rooms.
VCM vs. Liquid Lens Autofocus
While VCM dominates the consumer webcam market, liquid lens autofocus (based on electrowetting technology) is used in some specialized cameras as an alternative.
| Parameter | Voice Coil Motor (VCM) | Liquid Lens |
| Focusing speed | Moderate (~100–300ms) | Very fast (under 10ms) |
| Mechanical wear | Some, over time (spring fatigue) | None — no moving mechanical parts |
| Power consumption | Higher (~100–200mW) | Much lower (under 15mW) |
| Lens format compatibility | Limited to compact camera designs | Scalable to larger lens formats |
| Production cost | Low — mature, high-volume supply chain | Higher — newer, more specialized |
| Consumer availability | Standard in all autofocus webcams | Rare — mostly industrial/specialty use |
For consumer webcams in 2025, VCM remains the practical standard. Liquid lens systems are faster and more durable on paper, but their higher cost and lens compatibility constraints keep them out of the mainstream market.
Laptop Webcams and Windows Hello Face Recognition
Laptop bezels leave almost no room to work with, so manufacturers use extremely thin webcam modules. In many business laptops, these modules do more than handle video calls they also function as a biometric security system.
To support secure face login, these laptops pair a standard RGB webcam with a dedicated infrared sensor in the same module:
Proximity detection: A low-power sensor continuously watches the area in front of the screen and wakes the system as soon as someone approaches and locks it again once you walk away.
Biometric authentication: Once awake, an infrared LED briefly flashes invisible light onto the user’s face. The infrared sensor reads the reflected pattern, which works regardless of room lighting and cannot be fooled by simply holding up a photo.
Login: That captured pattern gets processed by Windows Hello, logging the user in without typing a password.
Physical privacy: Many of these modules also include a sliding mechanical privacy shutter, which physically blocks the lens path when the camera is not in use a guarantee no software setting can override.
FAQ
What is the most important sensor spec for a webcam? Physical sensor size, specifically the active area in mm² matters more than megapixel count. A larger sensor collects more light, which directly translates to cleaner video in real-world lighting conditions. Pair sensor size with BSI architecture for the best low-light performance.
What is the difference between BSI and FSI webcam sensors? FSI (Front-Side Illuminated) sensors have their wiring layer in front of the photodiodes, blocking some incoming light. BSI (Back-Side Illuminated) sensors flip and thin the silicon so the wiring sits behind the photodiodes, clearing the optical path and improving quantum efficiency by 30–40% compared to equivalent FSI designs.
Why does my webcam look blurry during long video calls? If your webcam uses a plastic lens, thermal focus drift is a likely cause. As the camera heats up during extended use, the plastic lens elements change their refractive index, physically shifting the focal point. A webcam with glass lens elements does not have this problem.
How does a proximity sensor work in a laptop webcam? It continuously monitors the area in front of the screen using a low-power infrared sensor and wakes the system the moment you approach, then locks it again once you walk away — useful for both convenience and basic security in shared spaces.
Why do some webcams need USB-C instead of standard USB-A? Higher-resolution webcams need more bandwidth to send uncompressed or lightly compressed 4K video without lag. USB-C (especially with USB 3.0 speeds) supports that bandwidth more reliably than older USB-A connections, which top out at USB 2.0 speeds in many systems.
What does automatic light correction actually do during video calls? Built-in HDR-style light correction (found in many premium webcams) automatically adjusts exposure in real time, so your face stays clearly visible even if you are sitting in front of a bright window or under harsh overhead lighting. It works by tone-mapping multiple exposures or dynamically adjusting per-region gain in the ISP.
What is focus hunting and how do I fix it? Focus hunting is when an autofocus webcam repeatedly racks back and forth without settling on a sharp image. It is most common in low light. To reduce it: improve room lighting, enable any “focus lock” feature in your webcam’s software, or consider switching to a fixed-focus webcam if you sit at a consistent distance from the camera.
What mounting options work best for a desk webcam? Most webcams include an adjustable clip that fastens onto a monitor’s top bezel. For more flexible angles — overhead shots, document capture — look for a webcam with a standard 1/4-inch tripod thread built into its base. This lets you mount it on any standard tripod or articulating arm.
Does sensor size affect video call quality for standard 1080p calls? Yes, noticeably. Especially in less-than-ideal lighting. Even if the output resolution is identical 1080p, a larger sensor collects more light per pixel, reducing digital noise and producing cleaner color. This is why a 1080p webcam with a large BSI sensor often looks better than a 4K webcam with a tiny sensor.
Final Buying Checklist
When picking a webcam for video calls or content creation, prioritize physical hardware quality over spec sheet numbers:
Sensor:
- BSI CMOS sensor (not FSI)
- 1/2.8-inch or larger sensor size
- Avoid budget 4K claims on 1/4-inch sensors
Lens:
- Multi-element glass lens for thermal stability
- Avoid plastic-only lenses for extended daily use
Autofocus (if needed):
- VCM-based autofocus with LUT calibration
- Look for “anti-hunting” or low-light AF stability mentions
- Fixed-focus is fine for consistent desk setups
Special features:
- Windows Hello IR support for business laptops
- Hardware privacy shutter for peace of mind
- Adjustable field of view if you use it in different settings
Don’t get pulled in by megapixel marketing. A 1080p webcam with a large BSI sensor and glass lens will outperform a 4K webcam with a tiny FSI sensor and plastic optics in nearly every real-world condition.